Planning Your Landscape Lighting

guy-landscapelighting-emailheader

The way your home looks in the day and how it appears at night are completely different. If you want more than a standard porch light to illuminate your home after dark, consider installing landscape lighting. Ideal for both residential and commercial applications, landscape lighting can shine your property in a whole new light, which provides many benefits you may not have thought of before. Here’s a quick guide to planning your landscape lighting.

Reasons to Install Landscape Lights

Before you start your landscape lighting project, understand the advantages you can enjoy once the exterior of your property is illuminated at night.
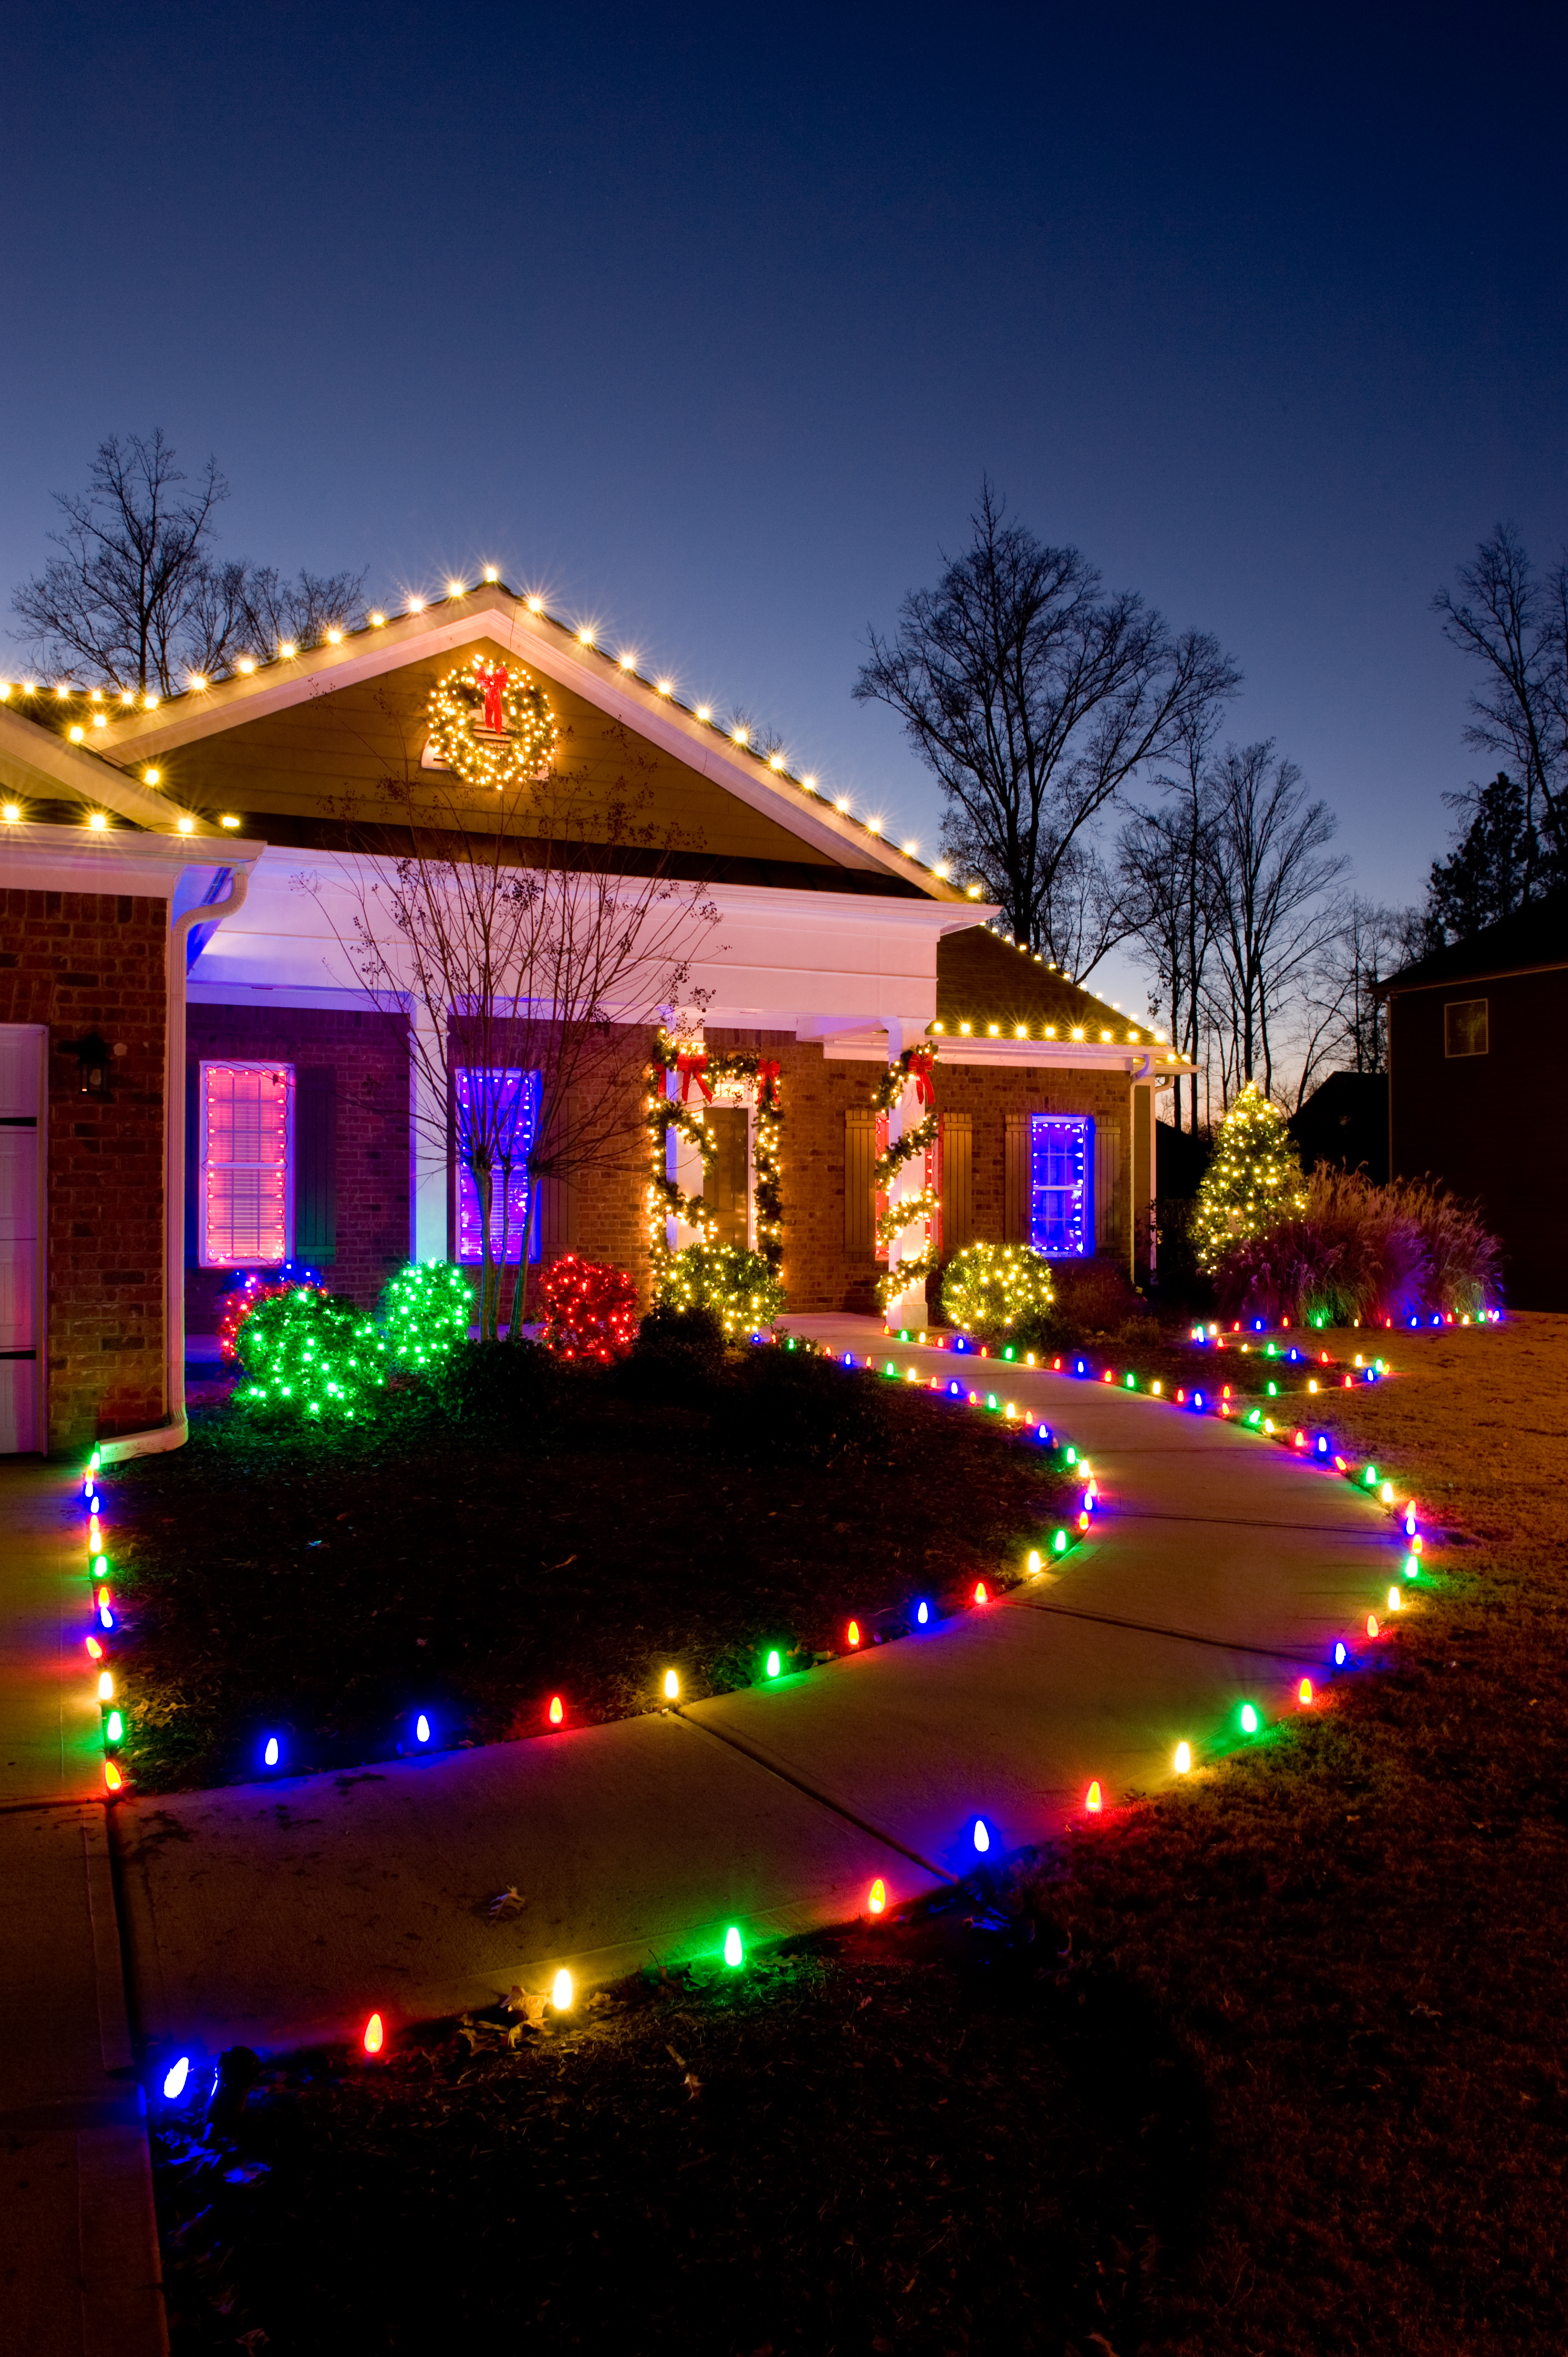
Curb Appeal

Strategically placed lights can accent certain architectural features of your home, making them visible even at night. Spots of light along pathways and in the garden also make your home look more inviting. Lights pointed upward at your favorite tree help you make the most of your landscape even after dark.

Functionality

If you put a lot of effort into making an outdoor living space in your back yard, there’s no need to stop the party just because the sun goes down. With sconces on the wall to illuminate the deck, pendant lighting on the ceiling to brighten the porch, and underwater pool lights, you can enjoy spending time outside in the evenings without sitting in the dark.

Home Security

A home or business with a brightly lit exterior is less appealing to a thief or vandal than a dark one. Security lights and motion sensors make it harder for criminals to approach the building without being seen, which helps make your property more secure.

Safety

Lights installed on the perimeter of paths and along stairs make them more visible, which decreases the chance of tripping and falling. Lighting along the driveway also makes it easier to pull in without difficulty.

Powering Your Outdoor Lights

If you want to enjoy the effect of outdoor lights without substantially increasing your energy bill, it’s worthwhile to look into energy efficient fixtures. Even then, landscape lights still consume some amount of energy and require a power source.

Circuit Box

For bright security lights or those used to illuminate large areas such as the driveway or deck, you need an electrician to wire the 120-volt fixtures directly to your circuit box. Then any outdoor wires must be buried at least 18 inches below ground.

Transformers

Low-voltage lights manage just fine when they’re powered by a transformer. Purchase one with a rating slightly larger than the total wattage you need to power your new landscape lights. Most residential-grade transformers must be installed outside. Commercial transformers, which you can also use in a residential setting, can be installed inside. For help installing the transformer and running cables, rely on a professional landscape lighting company.

Solar Panels

Solar-powered outdoor lights cost you nothing to operate because they soak up the sun’s energy all day and use this power to operate the lights at night. Low-voltage lights used along paths and in garden beds are best for this application. Make sure the solar panels, which are often attached to the fixtures themselves, receive full sun throughout the day.

Types of Outdoor Lighting

You have many options for lighting your property. As you consider your options, try simulating uplighting, downlighting and spotlighting with a powerful flashlight. This lets you sample the effect of lighting different areas of your home and garden so you get an idea of what the real thing will look like.

Lanterns and Sconces

These are particularly popular for front porches and back decks and patios. Lanterns and sconces mount to the wall and shine light over a broad area. They are examples of 120-volt fixtures that must be wired to a circuit box. Fixtures with frosted or shielded glass help reduce glare.

Pendant and Hanging Lights

120-volt pendants hanging from the ceiling provide an additional option for lighting an entryway, porch or covered patio. Then, low-voltage hanging lights strung through trees or the beams of a pergola add charming accents to the back yard.

Recessed Lights

You can install these lights in the eave overhanging your deck or garage door. Recessed lights provide downlighting while the fixtures themselves remain mostly hidden from sight. They are typically 120-volt fixtures, though smaller low-voltage recessed lights can also be used to light railings, posts and built-in deck furniture.

Floodlights and Spotlights

Available as both 120-volt and low-voltage fixtures, floodlights illuminate a wide area, such as the driveway, side of a building or tree. Spotlights are similar, but they shine a narrower beam to highlight a specific object, such as a garden statue or shrub.

Path and Garden Lights

Low-voltage lights are all you need to shine a small pool of light on a sidewalk or paved path, lighting the way to prevent tripping when it’s dark. Garden lights are similar and provide accent lighting in your flower bed.

In-Ground Lights

These are buried in the ground and covered with a weatherproof lens. They come in both 120-volt and low-voltage varieties and can be angled slightly to illuminate a wall, fence or tree.

Security Lighting

All landscape lights provide some degree of security by wiping out shadows on your property. Lights specifically made for security purposes are often installed overlooking the driveway or back entrance. These are typically very bright and only trigger when they sense movement, remaining illuminated for only a minute or two before turning back off again.

We provide installation, repair and replacement services for residential and commercial landscape lights. We can help you install and set light timers, replace burned out bulbs, repair and rebury below-ground wiring, realign tilted fixtures, manage transformers, and handle every other aspect of your landscape lighting project.

If you need help making your outdoor lighting idea a reality, please contact us
today. We can help your property look its best, even after dark, with professionally installed and maintained landscape lights.

Dethatch, Aerate, Seed: Bring Your Lawn Back Next Year!

With summer winding to a close, it’s time to concentrate on lawn recovery to ensure your grass returns with full force next spring. The best methods to accomplish this include dethatching, aerating and seeding your lawn. Once you learn why these steps are important and how to perform them, you’ll ensure a beautiful yard for years to come.


Dethatching Your Lawn

Most lawns experience areas where the grass dies just above the soil. Known as thatch, this layer of dead grass is beneficial in small amounts. However, when thatch builds up too quickly, it prevents water and air from reaching your grass, which can cause widespread brown patches.

How to Dethatch Your Lawn

Dethatching is a mechanical process that removes the inhibiting layer of dead grass for a healthier, greener lawn. You know it’s time for dethatching if more than a half-inch of dead grass has built up and begun to weaken your grass.

General dethatching tips:

  • Water your lawn the day before you plan to dethatch.
  • Mow your grass to half its normal height.
  • Flag sprinkler heads and other hidden objects to prevent damaging them.
  • Dethatch in two directions at a 90-degree angle from one another.
  • If thatching leaves bare spots, reseed your lawn.
  • Water the lawn well to help the grass recover.
  • Aerate regularly in the future to prevent thatch build-up.

 Dethatching your lawn with a convex rake:

If you only have a small patch of affected grass, a convex rake is an adequate dethatching tool. It can remove thatch up to 1-inch thick without placing too much stress on your lawn. The specialized rake features sharpened tines able to life thatch away from the soil surface.

When dethatching with a convex rake, use the same motion as traditional raking. Dig the tines into the thatch and pull upward to loosen and lift it out of the soil.

 Dethatching your lawn with a power rake:

For larger spaces, you’ll undoubtedly refer a power rake, also called a vertical cutter or verticutter. You can rent a power rake from a hardware store if you want to complete the job yourself.

Be sure to ask if the blades are spaced properly for your type of grass. Also, ask the rental company to adjust the cutting depth so the blades go no deeper than one-half inch into the soil, if at all.

Be aware that this equipment is large and requires some muscle to maneuver. You’ll also need a truck to transport it to your home and a second person to help load and unload it.


Aerating Your Lawn

As time goes on, soil naturally compacts. Aeration perforates the soil to allow air, water and nutrients to reach grass roots. It also removes mild thatch. This helps roots grow deeper, making the lawn more vigorous and drought resistant. Your lawn may need to be aerated yearly if it’s subject to heavy foot traffic.

How to Aerate Your Lawn

You have two main tools to choose from for the job: a spike aerator and a plug aerator. While it may seem sufficient to poke holes in the soil with a spike aerator, this doesn’t remove any soil mass and may actually lead to increased compaction near the holes.

For the best results, use a plug aerator, which removes plugs of grass and soil 2 to 3 inches deep and 0.5 to 0.75 inches wide. You can rent such a machine from a garden store if you wish to perform the job yourself.

Aerating your lawn:

  • Water your lawn the day before you plan to aerate the soil.
  • Make a single pass over the whole lawn and multiple passes over especially compact areas.
  • Allow the excavated soil plugs to dry, and then break them up with a lawn mower or the back of a rake.
  • Continue basic lawn care practices, including fertilizing, mowing and watering.


Seeding Your Lawn

The summer heat often leaves grass looking pitiful and scorched. Dead brown patches or thinning sections certainly don’t add to your home’s curb appeal. Seeding can fill in bare patches and replace sections of dethatched grass for a more beautiful lawn next season. Even if your lawn is still healthy and green, overseeding can further fill out the grass and make it even lusher come spring.

Fall is the right time to seed your lawn because the cooler temperatures help new seeds retain moisture, germinate successfully and become established without battling extreme summer heat.

 How to Seed Your Lawn

Start by reading the grass seed label to make sure you choose the right product for your lawn. You may want a seed blend that features two or more cultivars of the same species, such as fescue, in the same bag. This may help improve the appearance of your lawn.

Also, examine the coverage chart on the grass seed label to determine how much seed you should spread per square foot. Compare this to the drop rate of your broadcast or hand spreader to ensure you lay down the right amount of seed.

 Overseeding an existing lawn:

  • Mow the grass lower than usual.
  • Dethatch and/or aerate the lawn, if needed, using the instructions in the above sections.
  • Sprinkle the lawn with fertilizer.
  • Apply the seed with a broadcast or hand spreader.
  • Rake the seeds loosely.
  • Water normally.

 Fixing bare spots:

  • Test whether the damage is caused by pests and take proper pest control measures if needed.
  • Remove dead grass and rake the soil to loosen it.
  • Spread grass seed.
  • Rake the seeds loosely.
  • Apply a thin layer of weed-free straw to help keep the seed and loose soil in place.
  • Water the reseeded area frequently and shallowly to keep the soil moist without drowning or washing away the seeds.


If you’re uncertain about performing these important fall lawn care tips, you don’t have to do the job yourself. Whether you lack time, experience or confidence, count on The Grounds Guys® to complete these tasks for you!

Get Smart About Trees

Depending on where you live, certain trees work better in your yard than others. If you’re thinking about planting one popular variety or another, it’s best to first learn whether that tree grows well in your region or not. It’s time to get smart about trees and find out which ones you should plant for the best results.

Understanding Plant Hardiness Zones

The simplest way to figure out where a certain tree can grow is to identify its hardiness zones. North America is divided into 11 numbered zones, with Zone 1 describing subarctic conditions in Northern Canada and Alaska, and Zone 11 describing the tropical regions of Southern Mexico. In general, the further north you live, the lower your plant hardiness zone number is. In some maps, you may see zones further divided by the letters “a” and “b.” This lets you more accurately narrow down which zone you live in.

For your reference:

  • Winnipeg is in Zone 3
  • Quebec City is in Zone 4
  • Denver is in Zone 5
  • Nashville is in Zone 6
  • Oklahoma City is in Zone 7
  • Savannah is in Zone 8
  • Phoenix is in Zone 9
  • San Diego is in Zone 10
  • The coasts of Baja California are in Zone 11

Limitations of Hardiness Zones

While zone maps are helpful, they do have shortfalls. The information may be inaccurate based on the micro-climate of your exact location. Soil moisture and pH levels, elevation, ground slope, wind, sun exposure, and other conditions may prevent a tree rated for your climate zone from thriving.

For example, coastal Seattle is in Zone 8, as is dry Tucson, but the same plants won’t necessarily grow in both places. Keep this in mind when assessing your climate conditions and choosing which trees to plant.

Quaking Aspen

  • Hardiness: Zones 2 through 6
  • Micro-climate preferences: Aspens do best when planted in moist soils with full sun exposure. They can’t tolerate shade or summer heat, making them ideal for the Canadian and Northern US climate. However, they are also susceptible to damage in ice storms.

Quaking aspens got their name because their flat leaf stalks tremble in the wind. Beautiful powdery white bark and bright yellow leaves in fall make aspens a beautiful addition to your yard.

Elm Trees

  • Hardiness: Zones 3 through 9
  • Micro-climate preferences: These trees prefer moist yet well drained soil and full sun exposure. They adapt well to extremes in soil pH and have a high heat and wind tolerance. They’re native to the eastern half of North America.

Elms are praised for their stately shape and wide, spreading branches. Their leaves turn a beautiful gold color in the fall. Keep in mind that elms are susceptible to a devastating condition called Dutch elm disease. To prevent your elm from succumbing to this pathogen, be sure to choose a hybrid bred for resistance to Dutch elm disease, including Princeton and Valley Forge elm.

Cedar Trees

  • Hardiness: Zones 4 through 8
  • Micro-climate preferences: Native to the humid Pacific Northwest, cedar trees love continually moist, loamy soil and full sun exposure. They’re also very cold hardy, as is typical of evergreen trees.

The beautiful drooping bows of Alaskan cedars covered with green-grey needles create great visual interest in your yard. These trees grow to a medium size of up to 45 feet tall and 30 feet wide. Smaller varieties of cedar – the weeping Alaska cedar in particular – are available if you love the look but don’t have the space.

Beech Trees

  • Hardiness: Zones 4 through 9
  • Micro-climate preferences: Beech trees prefer acidic soils and tolerate alkaline soil moderately well. However, they can’t tolerate overly salty, wet or drought conditions. They prefer full sun or partial shade.

Beech trees have large, graceful branches that spread wide and hang low, making them ideal for large landscapes where you want plenty of shade. Massive trunks show off beautiful silver gray coloring, and dark green summer foliage turns bronze in the fall. Leaves hold on well into the winter months, providing beautiful seasonal interest. Beeches grow slowly and don’t transplant well, so be sure to select your planting location carefully.

American Hornbeam Trees

  • Hardiness: Zones 3 through 9
  • Micro-climate preferences: These flexible trees grow in a wide variety of climates and are native to eastern North America. Hornbeams do well in full sun, partial shade or full shade. They prefer acidic, moist and well drained soil, but they can also tolerate drought conditions and poor drainage.

The ability of hornbeams to grow in the shade makes them perfect for shady landscapes and woodland gardens. They provide a kaleidoscope of colors, starting with reddish-purple leaves when they first emerge in the spring. These turn dark green in the summer and yellow to orange-red in the fall. Be aware that hornbeams are difficult to transplant because of spreading lateral roots, so choose your planting location carefully.

Bald-Cypress Trees

  • Hardiness: Zones 4 through 11
  • Micro-climate preferences: Native to Southern wetlands and coastal areas, cypress trees prefer full sun to partial shade. Swampy, acidic soil produces the best results, but bald-cypresses also tolerate alkaline soil, drought conditions and poor drainage.

Bald-cypress trees can grow up to 70 feet tall and 30 feet wide. Unlike most evergreens, they lose their needles in the fall and grow new ones in the spring. The soft, feathery needles turn a russet-red color before falling to the ground.

Give us a call for more personalized tips!

Because of the limitations of hardiness zone maps, it’s helpful to work one-on-one with a local landscape specialist to make sure you choose the right trees for your micro-climate. The Grounds Guys offers comprehensive tree services, which range from helping you select the right trees to assessing the health of your current plants to laying fertilizer and spraying for pests.

To learn more about which trees are right for your yard, or to schedule tree services, please contact us. Our goal is to help your landscaping look its best all year round!

Tips for preparing your lawn and garden for Spring!

Creating a Beautiful Spring Lawn & Garden

As the weather warms, you may be excited to revive your dormant lawn and start gardening. Maybe you’ve been envious of your neighbor’s grass and flowers for a few seasons, and now you’re ready to learn the tricks for creating beautiful spring color on your own property. Here’s what your lawn and garden need to look their best this year.

Creating a Beautiful Spring Lawn

Your grass can look lush and beautiful without a lot of chemicals. Ditch the pesticides and fertilizers and follow these eco-friendly tips for a beautiful spring lawn.

• Water your lawn with 4 to 6 inches of water a time or two per week. Before you water again, make sure the soil is almost completely dry. Clay soil requires less frequent irrigation while sandy soil dries out faster and needs to be watered more often.

• Mow when the grass is dry and don’t cut the grass too short. By keeping the blades a few inches long, you shade the soil to prevent water loss and prevent weed germination. Even if the grass overgrows, try not to mow no more than one-third of the blade to prevent stressing your lawn.

• Leave grass clippings on the lawn to act as natural fertilizer. Only add actual fertilizer if your soil is nutritionally deficient. Then, use a small amount of slow-release fertilizer to help the grass absorb nutrients better.

• Aerate and dethatch the lawn in spring to promote better growth and greener grass. Aerating also helps reduce thatch buildup.

Creating a Beautiful Spring Garden

If you dream of creating a flower garden you can really be proud of, follow these tips to grow beautiful flowers with the least amount of effort.

• Install garden edging to keep the flowerbed separate from the lawn. Plastic, metal, flagstone or concrete are all potential edging materials.
• Trim back perennial bushes and clear away plant debris left over from last year.

• Prepare the soil by adding homemade compost, composted manure or store-bought flower food. Turn the soil with a sturdy trowel and mix in the organic material. The goal is to create soil the texture of crumbly chocolate cake.

• Plant annuals to fill in the gaps between perennials. To speed up the process, plant seeds in small indoor containers in late winter so they have time to grow before the weather warms up. You can also buy flowers that have already started growing and transplant them into your garden.

• Follow the instructions on the tag with regards to spacing, watering and preferred sunlight level. “Full sun” indicates the plant prefers four to six hours of sunlight, especially in the afternoon. “Partial shade” indicates the plant does better with a few hours of sunlight in the morning. “Full shade” plants do best in areas that never see direct sunlight.

• Lay down 2 to 4 inches of mulch to help your flowerbed look tidy. Mulch also serves the practical purposes of conserving water and preventing weed growth.

• Aim to give your plants about one inch of water per week. Infrequent deep watering is better than frequent shallow watering. Once a week, mix a balanced 20-20-20 fertilizer in your watering can to feed your flowers. Follow the directions on the packaging for the best results.

• Check on your flowers regularly. Deadhead them to prolong the blooming period. Cut back floppy or overgrown sections to keep your garden looking nice and promote fresh, new growth.
If you need help creating beautiful spring color in your lawn and garden this year, please give us a call. We offer many services to help your grass and flowers thrive.

Spring projects for your lawn

Spring is in the air, and that means you’re probably thinking about how to prepare your yard for warmer weather. If you’re in search of some inspiration, consider these spring trends and the benefits they provide in your back yard.


Landscape Trends

  • Entertainment: If you often have friends and neighbors over on summer evenings, now’s the time to transform your backyard landscape into one designed for entertaining. Hardscaped surfaces for tables and chairs, a fire pit, and an outdoor kitchen are all trendy right now.
  • Family fun: Homeowners with kids need a different type of landscape. A swing set, sandbox, sturdy trees for hammocks, seating area and fully fenced-in yard are all important for safe family fun.
  • Low maintenance: If you don’t want to spend a lot of time maintaining your landscape, plant native trees and grass, xeriscape areas to eliminate the need for watering or mowing, and install a pergola to shade and protect the seating area.


Spring Garden Trends

  • Creative flowerbed shapes: You’re not required to stick with traditional square and rectangular flowerbeds if you don’t want to. Curvy edges that mimic your home’s architecture or the shape of your lawn create a trendy, appealing look.
  • Texture, height, colors and shapes: The most aesthetically pleasing flowerbeds incorporate a variety of flowers that not only bloom at different times, but also showcase different textures, heights, colors and shapes. If you’re not sure what to plant together, seek a professional landscape designer’s advice.
  • White and green: While you can choose flowers of any colour for your spring garden, consider incorporating a bit of white and green to provide a cooling effect during the day and a slight “glow” at night.


Water Garden Trends

  • Pond: A backyard pond is the perfect opportunity to introduce a little wildlife into your garden. A properly installed, well-maintained pond can support fish for many summers. The water is also sure to attract songbirds and small mammals for you to enjoy from your patio.
  • Waterfall: The sound of rushing water is known to promote relaxation. If you’re looking for a way to unwind after a long day, installing a waterfall in your back yard could be the perfect solution.
  • Bubbler or fountain: These types of water features add a unique focal point to your yard. You’ll be excited to invite guests to sit and relax next to the water feature you install this spring.


Landscape Lighting Trends

  • Solar landscape lights: The type of outdoor lights you choose impacts your home’s energy efficiency. With solar-powered lights, you can enjoy a warm glow in the evening without increasing your energy bills one bit. That’s why solar landscape lights are definitely trendy right now.
  • Special features: Homeowners want full control over their landscape lights. Special features such as dimmer switches, motion detectors, timers and light sensors offer the right amount of control you need to make your landscape lights work just the way you want them to.
  • Path and walkway lights: While many landscape lights are there to highlight a unique water feature or architectural detail on the house, others serve a more functional purpose. If you install outdoor lights nowhere else, consider using them to light garden paths, stairs and walkways. A little extra light goes a long way in preventing a misstep that could lead to a painful injury.

To mulch or not to mulch?

GG-March-CCHeader-MulchMadness-CORP

As you think about getting your garden started once again this spring, you may be facing a quandary: to mulch or not to mulch? Consider the pros and cons of this common garden add-on to decide if it belongs in your yard this year.

 Benefits of Mulch

  • Mulch blocks the sun. This helps protect plant roots from heat damage and prevents weeds from taking hold.
  • Freezing, melting and refreezing water can cause heaving, which is when shallow-rooted plants pop out of the ground. Mulch lessens this effect and can help your perennials make it to next spring.
  • As the ground gradually warms up in early spring, perennials start to bloom. Mulch slows this ground-heating process so late-winter warmth doesn’t trick flowers into blooming before it’s really time.
  • Using mulch slows evaporation from the soil so your plants soak up more of the water you give them. This makes mulch a cost effective investment, especially in dry climates, by saving you time, money and water.
  • Mulch helps prevent the soil around your plants from eroding during heavy rainfall.

 Drawbacks of Mulch

  • Blocking sunlight to the soil can prevent seeds from germinating. Tip: if you’re applying mulch in the spring, wait until after seedlings have emerged.
  • Plant-eating slugs and earwigs enjoy the cool, dark shelter mulch provides. Tip: only apply a thin layer of mulch 3 to 5 inches away from plant stems if pests become a problem.
  • Slowing down the ground-heating process in spring may cause some flowers to bloom too late. Tip: rake back mulch to encourage perennials to bloom, and then recover the area once the plants are established.
  • Reduced evaporation isn’t always a good thing. If the weather is wet for several days straight, the soil could remain soggy and damage your plants’ roots. Tip: rake mulch away from your plants during prolonged rainy periods to promote better drying.

 Choosing and Applying Mulch

Since it’s possible to overcome pretty much every drawback of mulch in most situations, you may decide it’s right for your garden. To ensure you don’t regret your decision, choose your mulch wisely and apply it properly:

  • Choose a bark mulch product to promote healthy soil. Stone and gravel are other options, but don’t expect them to improve the soil’s composition.
  • Shredded bark and bark nuggets are the most popular forms of mulch. Your options include pine, cypress and hardwood trees.
  • Larger pieces of bark are heavier, making them a good choice if you’re worried about your mulch blowing away in the wind or washing away in a storm.
  • Dark-colored mulch absorbs and retains heat, which is a great benefit for cold regions. Light-colored mulches reflect heat and light, which is more desirable in hot regions.
  • A 3- to 4-inch layer of mulch is plenty for most applications.
  • You can apply mulch at any time of year. Just be mindful of the way it slows the ground-heating process in the spring and prevents heating in the winter.
  • When comparing the cost of different mulches, always consider your longevity needs. Perennial beds deserve quality mulch that will last several seasons. Annual beds may do fine with cheaper mulch, since you need to till this patch of soil every year before replanting anyway.

If you need help preparing your garden for another growing season, please contact us! We provide many landscaping services to help you achieve your most beautiful garden yet.

Preparing for Spring: Planting Annuals and Splitting & Replanting Perennials

GG-February-CC-PreparingForSpring-CORP


Want a beautiful garden this year but need a little help getting started? Follow these gardening tips so you hit the ground running as soon as it thaws.

 Planting Annuals

Some plants grow throughout the warmer months and then die when it gets cold. These are called annuals, and you need to replant them every spring. Since the plants die each year and don’t come back, you’re not making a huge commitment with annuals, but you still want your garden to looks its best for as long as possible.

 Tips for planting annuals

  • Plant at the right time based on your climate: If you live in a cold-winter climate, wait until the danger of a late frost has passed before you plant warm-season annuals. Mid-spring is also the right time to plant warm-season annuals like marigold, zinnia and impatiens, if you live in a warm-winter area. For cool-season annuals, such as pansy, primrose, and calendula, plant in very early spring if you live in a cold-winter climate. Fall is the best time to plant cool-season annuals if you live in a warm-season climate.
  • Give your annuals a strong start: If you’re afraid of a late frost but you want to get your annuals growing, plant seeds in an indoor pot to transplant later. You can also wait a few weeks into the season and purchase plants from a nursery. Choose relatively small plants with healthy foliage for the best results.
  • Water regularly: Seedlings and transplants may require water every day, but once they become established, you should only water when the soil starts to become dry. A few inches of mulch can help reduce evaporation and prevent weeds from becoming established.

 Splitting and Replanting Perennials

Other types of plants grow throughout the warmer months, die back to the ground in the winter and come back from the roots every spring. These are called perennials, and while you only need to plant these once, you may want to split and replant them every few years.

 Reasons to split and replant perennials

  • The plant has grown too large: When a plant starts leaning over a pathway or encroaching on neighboring plants, removing some of it helps restore the look of your garden.
  • The plant is getting old: As perennials age, they start to become weak in the center, producing smaller leaves and fewer flowers.
  • The plant isn’t growing well anymore: After several seasons, surrounding trees and shrubs may overshadow your perennials, causing them to grow poorly or become hidden from site. Replanting them elsewhere can give new life to your garden.
  • You want to share your plant: The beauty of perennials is that you can divide and replant – not just in your own garden, but in a friend’s garden who has admired your unique plant for years.

 Tips for splitting and replanting perennials

  • Divide in cool weather: You can technically divide perennials at any time, but for the quickest reestablishment, divide in the spring or fall.
  • Replant small sections: Smaller offshoots of the original plant tend to grow vigorously and produce long-lasting blooms. This means you shouldn’t simply divide an existing plant exactly in half or you’ll just end up needing to split and replant both halves again next season.
  • Replant only the healthiest pieces: If a plant has succumbed to pest problems, splitting and replanting is a great way to save it. Look for symptoms of disease in the plant’s roots and throw these pieces away rather than replanting them.

Preparing your lawn and garden for spring is a multi-faceted process that a wide-array of options. Let us help! We provide many landscaping services to accomplish a beautiful, healthy garden this year.

Paulk Outdoors Christmas Decor division featured in Turf Magazine!

topbgPaulk Outdoors is very proud to share that we were recently featured in Turf Magazine.  The article describes how other companies slow down in the dormant season while we begin our busiest season of the year.  Landscaping and lawn maintenance needs might slow down dramatically in the Fall and Winter, but we use that time wisely by offering full service exterior holiday decorating.  Paulk Outdoors began offering custom exterior holiday decorating in 2002 and our landscaping division was created in 2013.

To read that full article please click HERE

Christmas Decor is looking for a deserving family this holiday season

Henry - 7Every year Christmas Decor by Paulk Outdoors tries to find a home to decorate as a gift to a deserving family. We have decorated the home of a fallen soldier, a wounded veteran through Homes For Our Troops and a special little boy through Make-A-Wish America.

Do you know a family needs some holiday cheer?

It is time again for us to find someone that needs and deserves some extra Christmas cheer. Do you know of anyone in the Henry, Clayton or Fayette county area that we could help this year? Contact our office with their information and we will be happy to contact them directly.

IMG_9848IMG_9880

Spring will be here soon, is your landscape ready?

2599_1028165386523_7404809_nWinter in the metro Atlanta area has been a harsh one this year.  What damage has been made to your home, outdoor living spaces, lawn or gardens this year?  Are your lawn and gardens ready for Spring to come?  Leaves need to be removed, new pine straw or mulch needs to be applied and new flowers, shrubs and trees planted.  Wouldn’t you like some help with this or simply sit back and watch someone else do the work for you?  Paulk Outdoors can take care of simply cleaning up your lawn and gardens or we can install a brand new project that you’ve had in mind all winter long. Cory would be happy to come meet with you and design a brand new area for your family and neighbors to enjoy, or dress up an existing area.  Call today to schedule a time to meet with him, his schedule is filling up quickly!